
You may find it difficult to remove walls with texture. Although you can remove a textured wall it is not easy and will take patience. To complete this task you'll need various materials and techniques. It's worth the effort, though. It will give you a smoother, cleaner surface to paint.
Prime the walls before you start sanding them. This will keep the color from bleeding and make the texture stand out more. Also, make sure the walls are completely dry before beginning. For a smooth finish when sanding, you should always use a large sanding plate.
You will then need to apply the skim coat. A skim coat is a thin layer of joint compound that smoothens the drywall seams. It is the same technique used in traditional plastering. You will need to apply several layers. Each layer should dry for at minimum 24 hours before you apply the next. Use a large plaster knife to make sure that each layer is smooth.

After the first skim coat has dried, you'll need to begin sanding. You'll want to sand the texture in a circular motion. Sanding too coarse a texture can cause damage to the walls. This can be avoided by using 60-grit Sandpaper.
Using a sponge can help you create the textured look you want. Alternatively, you can use a stomp brush to form a knockdown pattern. Although these methods may require some practice, they will give your walls a 3-dimensional look you'll love.
Depending on the texture of the wall, you might need to apply another coat. Most walls with textured walls don't require this. You may need to do this if your surface is particularly rough or textured. You can usually cover the texture with another coat or joint compound.
To remove dirt and dust, wipe the surface clean with a damp cloth before you start sanding. You should remember that sanding walls will produce a lot more dust than normal. To keep dust down, use a box fan and other devices.
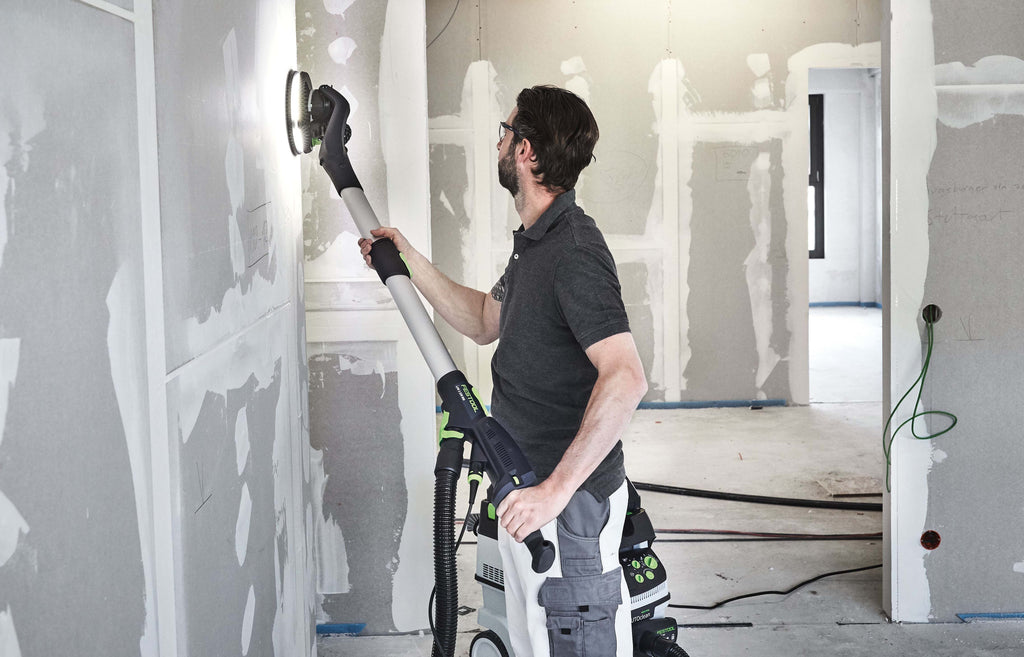
A good tip is to check the texture of the area using your fingernail. Any lines or uneven spots will be easier to remove when you know exactly where they are. Once you've identified the problem, you can begin to scrape the wall. A good work light will help you to see what's next.
Another way to remove the texture is to soak the wall in water. This method is best for walls that have not been painted. A water bottle sprayer is required and a sponge. Just spray one section of the wall with water. Let it sit for at least fifteen minutes. Let it sit for 15 minutes, then use your sponge to scrape away the surface.
Use a sponge to paint a contrast colour. For instance, if your wall has a purple pattern, you could paint it white.
FAQ
Are there ways to save money on home renovations?
By doing all the work yourself, you can save money. For example, you could try to cut down on the number of people you use during the renovation process. You might also look for ways to decrease the cost and use of materials in the renovation.
How many times should I change my furnace's filter?
How often your family expects to use the heating system in their home will determine the answer. You might consider changing your filter less frequently if you are likely to be away from your home for extended periods during the cold months. If you're not often out of your home, however, you may be more able to wait for the filter to change.
The average furnace filter will last approximately three months. This means that your furnace filters should be changed every three to four months.
Check the manufacturer's guidelines for when you should change your filter. Some manufacturers recommend that you replace your filter after every heating season. Others suggest waiting until there are visible dirt deposits.
Is it better for a contractor to hire or a subcontractor to do the job?
A general contractor will usually cost more than a subcontractor. A general contractor has many employees, so they often charge their clients a lot of money for labor costs. Subcontractors, on the contrary, hire one employee and charge less per hour.
In what order should home renovations be done?
The first thing you need to do when renovating your home is to decide where you want to put everything. You should consider how you want to market your home to potential buyers if you are planning to sell your house soon. The design of your kitchen and living room should be considered. Once you have chosen the rooms you want to remodel, you can start looking for contractors who can help you. You can then begin your renovations once you have hired an expert contractor.
Statistics
- Rather, allot 10% to 15% for a contingency fund to pay for unexpected construction issues. (kiplinger.com)
- They'll usually lend up to 90% of your home's "as-completed" value, but no more than $424,100 in most locales or $636,150 in high-cost areas. (kiplinger.com)
- Design-builders may ask for a down payment of up to 25% or 33% of the job cost, says the NARI. (kiplinger.com)
- A final payment of, say, 5% to 10% will be due when the space is livable and usable (your contract probably will say "substantial completion"). (kiplinger.com)
- It is advisable, however, to have a contingency of 10–20 per cent to allow for the unexpected expenses that can arise when renovating older homes. (realhomes.com)
External Links
How To
Are you renovating the exterior or interior first?
Which one should I do first?
There are many factors you need to consider when choosing which project you want to work on. The most common factor is whether the building is old or new. If the building is old, then there are many things to take into consideration such as the condition of the roof, windows, doors, flooring, electrical system, etc. There are many aspects to consider when a building is brand new. These include the size and style of the rooms, as well as their location.
The roof should be the first thing you look at if the building's age is a concern. If it looks like the roof could collapse any minute now, you may want to start on the renovation. Next, you can check if your roof is okay. Next, check out the windows. Next, inspect the windows and make sure they are clean. Next, check the doors for debris and clean them up. You can now begin to install the flooring if everything looks fine. Make sure that the flooring is solid and sturdy so that no matter how hard you walk on it, nothing breaks. The next step is to check the walls. Look at the walls and see if they are cracked or damaged. If the wall is intact, then you can move to the next step. The ceiling can be finished after the walls have been examined. You should inspect the ceiling to ensure that it can withstand any weight you put on it. If everything checks out, then you can move forward with your renovation.
If your building was constructed recently, you might want to look at the exterior. Take a look at the outside of your house. Is it maintained well? Is it free from cracks? Is it in good condition? If the exterior looks bad, it's time to make improvements. Your home shouldn't look shabby. Next, check the foundation. If your foundation appears weak, you should fix it. You should also inspect the driveway. It should be smooth and flat. If it's not, it should be fixed. You should also inspect the sidewalk while you're checking your driveway. If it's not level, you might need to replace it.
These areas should be checked before you move on to the inside. Begin by inspecting the kitchen. Is it well maintained and clean? You should clean up any mess. Next, make sure to inspect the appliances. They should be in good shape and working properly. If they're not, you can either replace them or repair them. Next, inspect the cabinets. If the cabinets are stained, or have been scratched, you can probably paint them. If they are in good shape, then you can move to the bathroom. Here, check the toilet. You should replace it if it leaks. If the surface is just dirty, it should be washed. Next, inspect all fixtures. Make sure they're clean. If they are filthy, clean them immediately. Lastly, check the countertops. They should be repainted if they are chipped or cracked. If they are smooth and shiny, then you should probably use some kind of sealant.
The last step is to check the furniture. Make sure that none of it is missing or broken. If something is missing or damaged, then you should likely find it. If something is broken, then you should probably repair it. After everything has been checked, you can go outside to finish the job.